Brushing up on my photography skills…….

1 Jun

Yesterday I had a wonderful opportunity to attend Emily Quinton’s Makelight photography workshop. As I mentioned a while ago I have a deep rooted passion for photography. You have heard the expression ‘All the gear and no idea’? well I have ‘no gear and no idea’! Not entirely true, as I have a Nikon Digital SLR but with no fancy lenses or equipment.

photo(29)

I’ve had an Instagram crush on Emily for quite some time. Her Instagram feed is so inspiring and filled with gorgeous florals, you can’t help feel you are on a mini vacation.

photo(28)

The workshop is pretty much perfect for anyone wanting to improve their photography skills for personal or professional reasons. I’ve learnt some invaluable tools to help me improve my photographs, as well as very useful tips on branding and incorporating those images into social media.

photo(31)Surprisingly the above photos are all taken by moi!

The last bit of advice from Emily was to start taking photos straight away. Don’t wait a week or two…. So off I went today. I took photos of our family meals, the kids, the garden and a few product shots. I had some time to myself where I wondered around the house looking at little nooks in a different light and then tried to take some photos in a new and creative way. I tried to hide from my kids and take photos of them in secret, as opposed to getting the usual ‘CHEEEESE’ smile!

It was fun and I really enjoyed taking the time to do this. So this week I am going to make a conscience effort to improve my photographs. Wish me luck and have a wonderful week xxx


A Vintage Glam Table Setting

28 May

Vintage has been such a popular trend within the Wedding world, but this year a new trend is emerging involving sparkles. So what happens when you combine the two trends – Vintage Glam!

Image

When planning your big day you will either look for inspiration from wedding trends or forge your own style, but you can’t deny that sequin linen is gorgeous, especially if you love a bit of sparkle!

Image

The pink sequin tablecloth is used as the backdrop to this vintage glittering table setting. Lots of brides love the vintage look but we decided it was time to glam things up and add some sequins.

Image

To take the sparkle to the next level you can add paper decorations, tassel garlands and props to compliment your table setting. Use ones that add more sparkle such as glitter or shiny metallics. We have used a tassel garland which includes mylar, which is a shiny paper/film that compliments the table setting perfectly.


Image

Beautiful vases with flowers casually clustered in gold and pink tones give a relaxed feeling to the table to stop things becoming too formal. Scented tuberose and roses added the glamour along with gold foliage.

Image

I am definetely keen to explore this theme more with different colour sequins and decorations, time to get planning! Love to know what you think about this combo?

Suppliers:

Photography: Jay Anderson Photography

Sequin Linen & Decorations: The Sweet Hostess

Vintage Crockery and Cakes: Mrs Terrance

Flowers: Tarnia Williams for Fowers

#WOW Awards

14 Apr

Am literally still buzzing from our #WOW Twitter award on the 12th March. Most of you are probably wondering what I am talking about……

Image

Jacqueline Gold CEO of Anne Summers and Knickerbox runs a weekly twitter competition every Wednesday (hence the #WOW – Women on Wednesday’s) for female entrenpenurs. You tweet her at a certain time on Wednesday using the #WOW hashtag about your business and she will retweet the top three.

Image

The recognition that my little business is doing good is so amazing and we are feeling truly blessed at the moment. Sorry that this is a ‘blow your own trumpet’ post, just feeling really chuffed 🙂


Easter Cupcake Tutorial

9 Apr

Today I would like to welcome Kimberley from Bliss Bespoke who is the creator and maker of some utterly gorgeous cakes. I had the pleasure of working with Kimberley on several styled shoots and her designs are simply gorgeous. She will be taking you a step by step tutorial on how to ice some Easter cupcakes. Enjoy!

final easter cupcake with border last


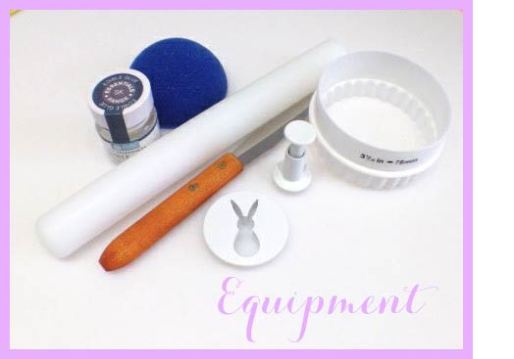
Equipment you will need: 

Rolling pin

78mm round cutter

Mini Palette knife

10mm circle cutter

Bunny cutter

Foam balls cut in half

Edible glue or water

Small paint brush

Piece of kitchen towel

Pre-coloured sugar paste

White sugar paste

Image

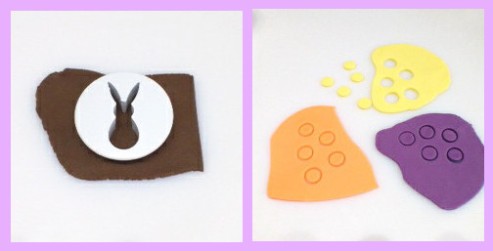
Step 1: Making your cut outs

Roll out your coloured sugar paste’s to a thickness of approx 2mm. Use your circle and bunny cutters cut out your shapes. Lift them onto the piece of kitchen towel using your mini palette knife. Be careful at this stage as your sugar paste is very soft and you could lose the shape of your cut outs.

Image

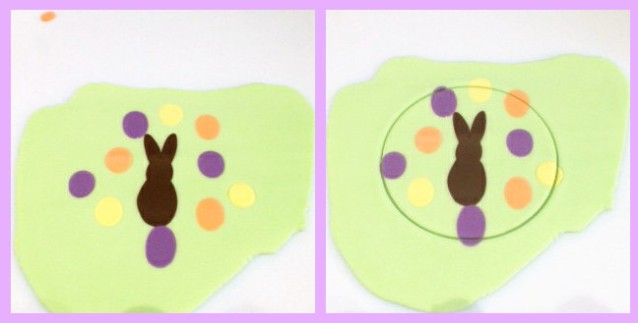
Step 3: Arrange your cut outs

Roll out a larger piece of coloured sugar paste to a thickness of approx 4mm.

Carefully lift the cut out shapes off the kitchen towel and arrange them on the large piece of sugar paste. Once you have them arranges in your final design, using your rolling pin gently roll over all the cut outs.  Do not press to hard and only use slight pressure at this stage or your design will distort its shape. The cut outs will blend into the base piece of sugar paste. You do not need to use any edible glue or water at this stage. The sugar paste is tacky enough so they stick.

Step 4: Cutting out your final topper

Use your 78mm cutter to cut out a circle making sure your bunny is in the centre of the circle. Sugar paste is soft so can become miss-shaped easily so take your time at this stage. Remove the outer excess sugar paste leaving your perfect circle.

Image

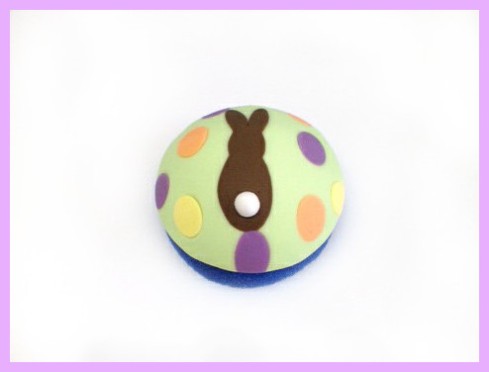
Step 5: Forming the dome

Place your final cut out circle on to half a foam ball. You will need to smooth the sugar paste on to the foam ball. You do this by placing the half foam ball on your work top and with the palms and outer sides of your hands gently smooth and ease the sugar paste to the foam ball. Try to only use the fleshy broad parts of your hands as using your fingers will leave marks on the sugar paste. Gently is the key at this stage so you do not spoil your design.

Roll a small piece of white sugar paste in your hands for your Bunnies tail and stick in place using edible glue or water.  Leave to dry at room temperature for at least 3 hours.

It’s better to make these the day before and leave then out at room temperature to dry properly.

Easter Cupcake Tutorial


Step 6: Constructing your cupcakes

Now your domes Bunny toppers are all made and had a day to dry you’re ready to construct the cupcakes.

Fill a piping bag with your regular butter cream mix and cut a hole in the end approx 2cm. Then pipe a swirl of butter cream from the centre of your cupcake to no closer than 1cm from the edge of the cupcake. Place your bunny dome on top of the butter cream. You can use a piping nozzle in the piping bag but I don’t when making domes cupcakes as you cannot see the butter cream so no need for a fancy design.

For extra decoration add a ribbon to your cupcakes but remember to remove them before letting children eat the cupcakes.

Hints and Tips:

Another name for sugar paste is ready to roll icing, fondant and Regal ice. They are all the same type of icing. It depends which country you come from what you call it. It set firm but not hard and is easy to eat and traditionally what celebration cakes are covered with in the UK.

I make my dome toppers a week ahead of time and once they have been sat on the foam balls for 3 hours they can be removed and places on a flat foam pad. This enables me to re-use the half foam balls for other toppers.

I hope you enjoyed this tutorial and if you would like to see more of my cakes then take a look at my website

Supplier List

Rabbit cutter

Circle cutter

78mm cutter

Edible glue

Mini Palette knife

Dome Ball

Sugar paste: white and pre-coloured sugar paste is available in most supermarkets. Or you can buy from here

We hope you enjoyed this cupcake tutorial! If you fancy giving it a go yourself, please let us know. Would love to see your creations.

Melissa

x

Confetti & Pink Styled Shoot

25 Mar

Late last year I was asked to provide some of our products for a styled shoot. When I heard the theme was confetti there was no need to convince me any further. As a bit of a confetti lover myself (sort of goes with the job…) I was intrigued to see the end results.

Charlotte Garret, designer and stylist super wizz organised the shoot with a wealth of other fab suppliers including EFC Photography who took all the gorgeous shots. Below are a few photos of some of our products including cake stands, tassel garlands and sugar swizzle sticks.

Image

Image

Ou lovely Miss Etoile cake stands in lemon. Cakes by the talented Bliss Bespoke.

Image

Image

ImageImageImageImage

This is only a little snapshot of all the images from the shoot. You can go and see all the confetti inspired images and full details via the The Wedding Community Blog.

Enjoy xxx

Credits:

Photography: Bea and Jude of EFC Photography

Styling: Charlotte Garrett and EFC Photography

Cakes and Biscuits: Bliss Bespoke

Cake Stands, Swizzle Sticks and Tissue Paper Garland: The Sweet Hostess


Valentines Day Cupcake Tutorial

6 Feb

We are so very pleased to have the very talented Vicky Turner from The Yellow Bee Cake Company here do a guest post on how to make some very cute and simple Valentines Day cupcakes. Not only does Vicky make gorgeous cupcakes and cakes she has a wealth of knowledge when it comes to tricks and tips on creating your very own cupcakes at home. How gorgeous are these little cakes? Please let us know if you decide to make any – we would love to see your photos. Handing you over to Vicky now to give you step by step instructions on how you can create your very own Valentines Day Cupcakes. Enjoy!

Image

Equipment:

A Rolling Pin.

Edible Ink Pen in Red, or whatever colour takes your fancy.

A Sharp Knife or Scalpel.

A Paintbrush.

Edible Glue or Water.

A Silicone Heart Mould.

Pre-coloured Red Icing. You can buy this in most supermarkets.

White Icing.

Image

Before we start:

To create intricate details and models on cakes, you will need to turn your icing from a standard cake covering paste into modelling paste. You can complete this tutorial without this step, however it will make it a lot easier to work with. Here’s the recipe should you wish to use it. (NB You can purchase pre mixed modelling paste from Sainsburys)

Modelling Paste

Knead ½ tsp of Tylo Powder into 250g of sugarpaste. It can be used straight away, but is best left wrapped for a few hours.

Image

Step One: Making Hearts.

Roll your Red icing into smooth balls and roughly give them the shape of a heart, so that they fit into the mould. Use your thumb and fingers to push the paste into the mould. Leave the hearts in the mould for a few hours to let them dry to shape. Gently rock and bend the mould until the icing starts to come loose. If your icing is sticking you can try adding a small amount of icing sugar or trex to the mould before you put the icing in.

Image

Step Two: Making your banner.

Roll out your White icing until it’s about 1mm thick. Cut out a long thin strip of paste. Use your knife to cut a “V” shape into each end (see above). Use your fingers to bend the paste, so that it wraps around the heart. Once you’re happy use a small amount of glue or water to attach the banner to the heart.

Next up is the writing! Who do you want to dedicate this cupcake too? I chose to simply write “Love” on mine, but you could write anything that takes your fancy, as long as it fits!

Step Three: Piping and decorating.

To pipe this cupcake, I filled a disposable piping bag with buttercream, snipped off the end to create a hole about 2cm in diameter and piped a swirl starting from the outside and working in. Feel free to use a nozzle if you wish 🙂 Place the Heart in the centre and then use any spare hearts you’ve made to decorate the cupcake.

Hints and Tips:

I often get asked the differences between all the various icing names. Here is a simple guide.

Sugarpaste/Fondant/Ready To Roll/Ready Ice – These are all the same icing, just with different names. Just to confuse you! This icing is used to cover cakes.

Modelling Paste/Gum Paste – This icing is used to create models and detailing on cakes and cupcakes. The recipe is at the start of this guide if you wish to make your own.

Flower Paste – This has a nice simple name, it’s used for making flowers! Those beautiful delicate flowers you see made from sugar are made from this paste. You can also model with it.

I hope you enjoyed this tutorial if you’d like to see more of my work pop over to my facebook page https://www.facebook.com/YellowBeeCakeCompany where you can find details of my latest classes.

Red & Gold Sugared Almond Sweet Table

2 Feb

Last year I worked with an amazing couple Bee and Lorenzo to create a sugared almond sweet table. As Lorenzo was Italian and there would be a large number of their guests flying over from Italy they were keen to incorporate some traditions that would make them feel included.

Image

I must admit I hadn’t worked with sugared almonds much last year, 2013 was a year where wedding favours had become more creative and unique. DIY favours had become popular which was great as it really did add the personal touch to weddings. So sugared almonds may seem old fashioned to some, but really when you bring it back to basics it is a lovely tradition and they actually taste really nice!

So what is the tradition all about? Five sugared almonds would be given to guests in either a small box or fabric pouch, the almonds each represented fertility, longevity, wealth, health and happiness. A kind of nice tradition don’t you think? Even though they have primarily been popular in Europe, Italy seem to be classed as the home of ‘Bomboniere’.

Image

Getting back to Bee and Lorenzo, they had decided to create a sweet table full of sugared almonds. This would also double up as wedding favours to their guests. Such a great idea as it wasn’t just a little nicely placed wedding favour at the guests tables. The sweet table had become a talking point. Guests had mingled around the table, talked about the tradition, the Italian guests felt appreciated. It was a win win really.

The colour theme was red and gold. You can get some fabulous red and gold almonds, but on this occasion the white adds a nice contrast to the gold and red ribbons and candy labels. I use the BEST wholesaler for sugared almonds, they are all imported from Italy and they are TOP quality. The best thing is that they also stock chocolate dragees and flavoured sugared almonds which are honestly so tasty I can’t even tell you! She had flavours such as black cherry, cappuccino and strawberry.

Image

So what do you think of this tradition and the spin Bee and Lorenzo put on it? I was lucky enough to see Bee, Lorenzo and some of the guests still on the dance floor at the end of the night. People were still hovered around the table and I always breathe a sigh of relief when the table is pretty much empty, but their are still a few sweets lurking in the jars. Guests were back and forth from the dance floor to the sugared almond sweet table. At that time of the evening people had given up and putting their almonds in the pouch and hands were scooping up the almonds with pleasure.

Happy New Year!

2 Jan

Hello all, happy new year to you all. Wow, I can’t believe it is 2014!! I know it is a tad predictable, but seriously where did 2013 go?!! Mine was a whirlwind year of working on The Sweet Hostess and spending time with my gorgeous boys (and my poor hubby :-). I finally came to accept their is no such thing as a perfect work/life balance. Saying that, I am really looking forward to getting organised and focused this year.

ImageSooo back to my lists, goal setting and weekly targets! Do you like making resolutions or setting goals? I think you either love them or hate them, right? Well I love goal setting and even though I usually break them, their is something positive about aiming to be a better person. I was recently inspired by Design Darling’s post on 101 things to do in 1001 days. I have made my very own list of 101 things to do. Some of the items are quite simple and others really push me out of my comfort zone.

I would love to hear from you if you have any resolutions? Hopefully I will tick another of my list tomorrow – starting  boot camp. Eeek! Wish me luck xx

PaperCrafter Magazine ♥ Christmas Inspired Sweet Table

10 Dec

We are so happy to be featured in Issue 66 edition of PaperCrafter magazine. We were asked to provide some blue, white and grey products for a vintage sweet inspired Christmas table.

Paper Crafter Magazine 3

The ‘Perfect Paper Party’ was inspired by a cool and frosty colour scheme. I love the results, what do you think?

paper crafter magazine

We provided polka dot baking cups, paper straws, floral embellishments, paper bags, bakers twine, mini cardboard cake stands, bakers twine, crimped paper shred and our tissue fans. PaperCrafter also asked us to provide some tips and tricks on how to create the perfect vintage inspired spread at home. In case you missed it, here is what we recommend!

♥ Stick to a colour theme and streamline the decorations to give a sense of consistency.

♥ If your creating a vintage feel it can be difficult to achieve a uniformed colour scheme, but that is part of the style! I’ll often display old crockery and service pieces alongside newly-sourced bits.

♥ Is your spread missing something? When in doubt, add flowers. You will be surprised at how they can really finish off a table and they compliment a vintage theme perfectly.

♥ Try using old family recipes that evoke warm and happy memories. It will give you and your guests something to chat and reminisce about.

paper crafter

Go and pick up a copy and tell us what you think 🙂

xx

Snowflake Giveaway

5 Dec

Since moving to the UK over 10 years ago I love everything to do with snow and snowflakes. I wonder if I would be this obsessed if I was still in Melbourne celebrating Christmas in 40 degree heat?!

The Sweet Hostess have a very special snowflake giveaway for you. In our snowflake party pack we have –

Red snowflake Paper Straws, 25 pack

Small Snowflake Paper Decoration

Medium Snowflake Paper Decoration

Red Honeycomb Ball

ImageAll you need to do is Like our Facebook page, like the pinned post, share the pinned post and leave a message in the comments. Simples!

The giveaway winner will be on Sunday 8th December. Good luck!