Archive | Tutorials RSS feed for this section

Easter Cupcake Tutorial

9 Apr

Today I would like to welcome Kimberley from Bliss Bespoke who is the creator and maker of some utterly gorgeous cakes. I had the pleasure of working with Kimberley on several styled shoots and her designs are simply gorgeous. She will be taking you a step by step tutorial on how to ice some Easter cupcakes. Enjoy!

final easter cupcake with border last


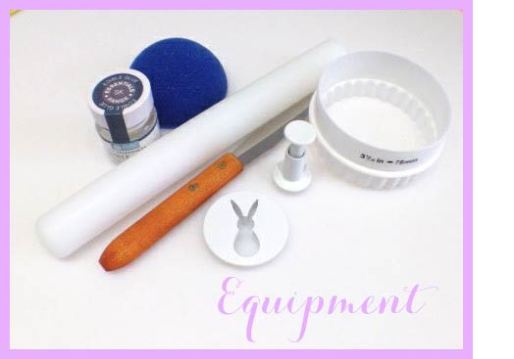
Equipment you will need: 

Rolling pin

78mm round cutter

Mini Palette knife

10mm circle cutter

Bunny cutter

Foam balls cut in half

Edible glue or water

Small paint brush

Piece of kitchen towel

Pre-coloured sugar paste

White sugar paste

Image

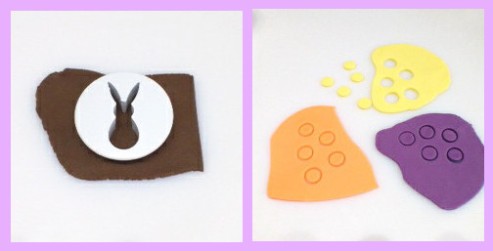
Step 1: Making your cut outs

Roll out your coloured sugar paste’s to a thickness of approx 2mm. Use your circle and bunny cutters cut out your shapes. Lift them onto the piece of kitchen towel using your mini palette knife. Be careful at this stage as your sugar paste is very soft and you could lose the shape of your cut outs.

Image

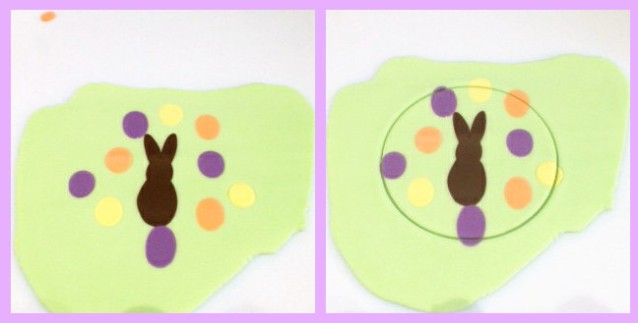
Step 3: Arrange your cut outs

Roll out a larger piece of coloured sugar paste to a thickness of approx 4mm.

Carefully lift the cut out shapes off the kitchen towel and arrange them on the large piece of sugar paste. Once you have them arranges in your final design, using your rolling pin gently roll over all the cut outs.  Do not press to hard and only use slight pressure at this stage or your design will distort its shape. The cut outs will blend into the base piece of sugar paste. You do not need to use any edible glue or water at this stage. The sugar paste is tacky enough so they stick.

Step 4: Cutting out your final topper

Use your 78mm cutter to cut out a circle making sure your bunny is in the centre of the circle. Sugar paste is soft so can become miss-shaped easily so take your time at this stage. Remove the outer excess sugar paste leaving your perfect circle.

Image

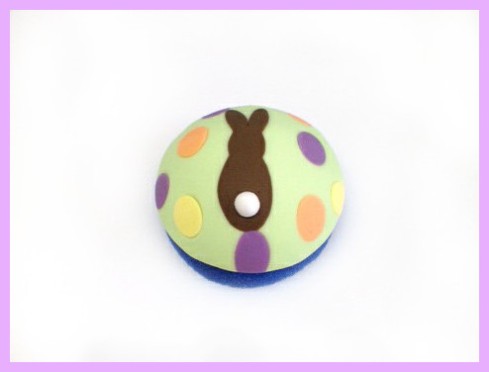
Step 5: Forming the dome

Place your final cut out circle on to half a foam ball. You will need to smooth the sugar paste on to the foam ball. You do this by placing the half foam ball on your work top and with the palms and outer sides of your hands gently smooth and ease the sugar paste to the foam ball. Try to only use the fleshy broad parts of your hands as using your fingers will leave marks on the sugar paste. Gently is the key at this stage so you do not spoil your design.

Roll a small piece of white sugar paste in your hands for your Bunnies tail and stick in place using edible glue or water.  Leave to dry at room temperature for at least 3 hours.

It’s better to make these the day before and leave then out at room temperature to dry properly.

Easter Cupcake Tutorial


Step 6: Constructing your cupcakes

Now your domes Bunny toppers are all made and had a day to dry you’re ready to construct the cupcakes.

Fill a piping bag with your regular butter cream mix and cut a hole in the end approx 2cm. Then pipe a swirl of butter cream from the centre of your cupcake to no closer than 1cm from the edge of the cupcake. Place your bunny dome on top of the butter cream. You can use a piping nozzle in the piping bag but I don’t when making domes cupcakes as you cannot see the butter cream so no need for a fancy design.

For extra decoration add a ribbon to your cupcakes but remember to remove them before letting children eat the cupcakes.

Hints and Tips:

Another name for sugar paste is ready to roll icing, fondant and Regal ice. They are all the same type of icing. It depends which country you come from what you call it. It set firm but not hard and is easy to eat and traditionally what celebration cakes are covered with in the UK.

I make my dome toppers a week ahead of time and once they have been sat on the foam balls for 3 hours they can be removed and places on a flat foam pad. This enables me to re-use the half foam balls for other toppers.

I hope you enjoyed this tutorial and if you would like to see more of my cakes then take a look at my website

Supplier List

Rabbit cutter

Circle cutter

78mm cutter

Edible glue

Mini Palette knife

Dome Ball

Sugar paste: white and pre-coloured sugar paste is available in most supermarkets. Or you can buy from here

We hope you enjoyed this cupcake tutorial! If you fancy giving it a go yourself, please let us know. Would love to see your creations.

Melissa

x

Valentines Day Cupcake Tutorial

6 Feb

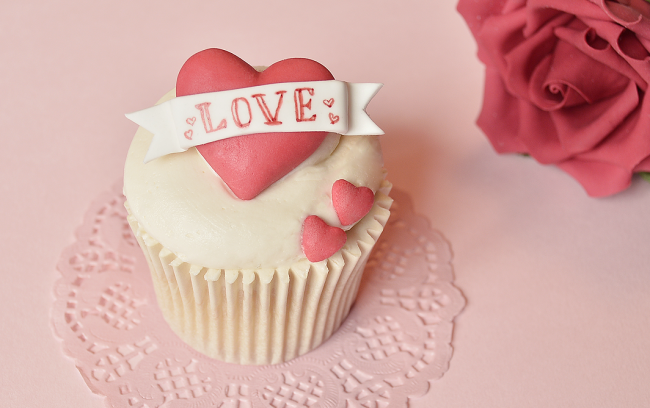
We are so very pleased to have the very talented Vicky Turner from The Yellow Bee Cake Company here do a guest post on how to make some very cute and simple Valentines Day cupcakes. Not only does Vicky make gorgeous cupcakes and cakes she has a wealth of knowledge when it comes to tricks and tips on creating your very own cupcakes at home. How gorgeous are these little cakes? Please let us know if you decide to make any – we would love to see your photos. Handing you over to Vicky now to give you step by step instructions on how you can create your very own Valentines Day Cupcakes. Enjoy!

Image

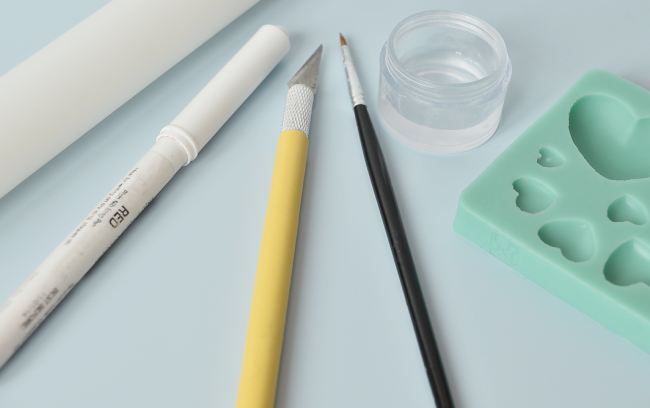
Equipment:

A Rolling Pin.

Edible Ink Pen in Red, or whatever colour takes your fancy.

A Sharp Knife or Scalpel.

A Paintbrush.

Edible Glue or Water.

A Silicone Heart Mould.

Pre-coloured Red Icing. You can buy this in most supermarkets.

White Icing.

Image

Before we start:

To create intricate details and models on cakes, you will need to turn your icing from a standard cake covering paste into modelling paste. You can complete this tutorial without this step, however it will make it a lot easier to work with. Here’s the recipe should you wish to use it. (NB You can purchase pre mixed modelling paste from Sainsburys)

Modelling Paste

Knead ½ tsp of Tylo Powder into 250g of sugarpaste. It can be used straight away, but is best left wrapped for a few hours.

Image

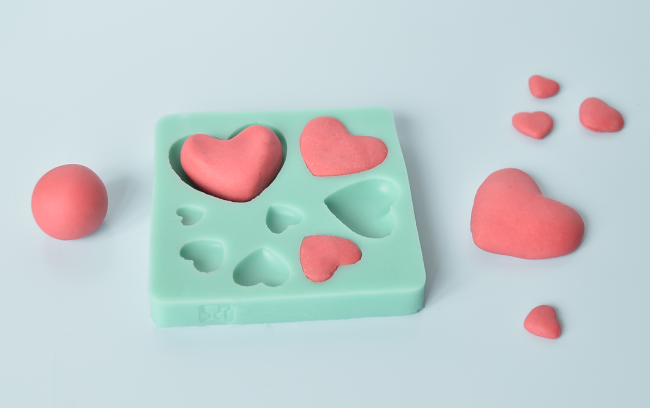
Step One: Making Hearts.

Roll your Red icing into smooth balls and roughly give them the shape of a heart, so that they fit into the mould. Use your thumb and fingers to push the paste into the mould. Leave the hearts in the mould for a few hours to let them dry to shape. Gently rock and bend the mould until the icing starts to come loose. If your icing is sticking you can try adding a small amount of icing sugar or trex to the mould before you put the icing in.

Image

Step Two: Making your banner.

Roll out your White icing until it’s about 1mm thick. Cut out a long thin strip of paste. Use your knife to cut a “V” shape into each end (see above). Use your fingers to bend the paste, so that it wraps around the heart. Once you’re happy use a small amount of glue or water to attach the banner to the heart.

Next up is the writing! Who do you want to dedicate this cupcake too? I chose to simply write “Love” on mine, but you could write anything that takes your fancy, as long as it fits!

Step Three: Piping and decorating.

To pipe this cupcake, I filled a disposable piping bag with buttercream, snipped off the end to create a hole about 2cm in diameter and piped a swirl starting from the outside and working in. Feel free to use a nozzle if you wish 🙂 Place the Heart in the centre and then use any spare hearts you’ve made to decorate the cupcake.

Hints and Tips:

I often get asked the differences between all the various icing names. Here is a simple guide.

Sugarpaste/Fondant/Ready To Roll/Ready Ice – These are all the same icing, just with different names. Just to confuse you! This icing is used to cover cakes.

Modelling Paste/Gum Paste – This icing is used to create models and detailing on cakes and cupcakes. The recipe is at the start of this guide if you wish to make your own.

Flower Paste – This has a nice simple name, it’s used for making flowers! Those beautiful delicate flowers you see made from sugar are made from this paste. You can also model with it.

I hope you enjoyed this tutorial if you’d like to see more of my work pop over to my facebook page https://www.facebook.com/YellowBeeCakeCompany where you can find details of my latest classes.

DIY Easter Candy Jar

24 Mar

A couple of weeks ago we were lucky enough to do a guest blog feature for Crafts and Giggles. The owner Katie Rand runs craft work shops for children and adults, take a look at their amazing gallery to check out some of the activities they do.

I created a variety of cute Easter jars using the following equipment…….

Image

It honestly does not take long at all and I think the outcome looks pretty nice, what do you think?

Image

Image

Image

You can check out the full tutorial here. If you do get a chance to make any Easter sweet creations please let me know, I would love to see you photos!

Have a wonderful week xx

How to Fluff your Tissue Pom Poms to Perfection Tutorial

5 Mar

We are so pleased to be stocking some gorgeous tissue pom poms. They are such a simple decoration yet have a massive impact when styled at your event/home/shop. Some of our customers are surprised when they arrive flat packed. The reason for this is they simply do not travel well in the post when they are ‘fluffed’. In all our pom pom packs we do include instructions, but I thought I would just write a quick tutorial and include a few piccies to help you along the way.

Image

Step 1: You will receive your tissue pom pom something like this.

Step 2: Fan out your pom pom. Usually one side at a time is perfectly fine.

Step 3. This is probably the most important step. Carefully pull the strip of tissue paper one by one. It is vital that the first couple are strips are pulled up at a 90 degree angle. If you don’t pull it up straight you often come out with a wonky pom pom. But wonky pom poms look cute nevertheless 🙂

Step 4: Once you have fluffed one side, then you can continue the other side by repeating the above step. You should then have your finished pom pom!

Most pom poms appear slightly oval shape, so you can use your hands gently to create a more rounded shape.

And this is the finished outcome….. Voila!

Image